
Backstory
Here in Maple Valley, WA, we have two repeaters, one for 2m analog and one for 70cm D-Star. They have shared Internet infrastructure, as well as a RasPi that was performing both EchoLink/IRLP and D-Star Gateway functions using EchoIRLP and ircDDBGateway, respectively.
For a variety of good reasons, I have been planning on relocating both the 2m analog and 70cm D-Star repeaters. Relocating the 2m repeater is complicated for us, because of 2 other repeaters that are co-channeled (output on the same frequency) both north, in Vancouver BC, as well as south, in Longview WA. Comparatively, relocating the 440Mhz/70cm D-Star repeater is pretty trivial. We're not co-channeled and the range won't be an issue.
Given I was going to be moving the repeaters, separately (at least temporarily), I had an opportunity to trying something a little different..
I set up the Icom ID-RP2C (D-Star repeater controller) with a purpose built Raspberry Pi image called Pi-Star, which is frequently used for people wanting to put small D-Star hotspots at home, or on the go.
This was the first time I used ircDDBGateway, so after working through the troubleshooting list like issues/concerns, I've come up with the following errors, which I think are the last pieces I needed to solve to get this Pi-Star operational for this repeater.
Here's my config and troubleshooting process for this setup.
About the Icom RP2C config, do first:
- Configure the RP2C with the challenging-to-find-and-really-expensive-if-you-buy-it "Utility for RP2C" from Icom. Default password to read is PASSWORD. (I would not recommend changing it because I haven't found a reset procedure for the RP2C if you forget it.)
- By default the RP2C is configured from Icom as 172.16.0.1 (against all normal IP-ing conventions), without a gateway, which is fine, since its' only talking to the Pi-Star, and, presumably, the Pi-Star is in the same switched network as the RP2C.
- By default, the Communications Settings port will be 20319. You need to change this to 20000.
- Don't forget to go into Option/Network Setup to change the Port after you change it from the default of 20319 to 20000.
- Control Software: Set Controller Software to : DStarRepeater.
- Control Software: Set Controller Mode to: Duplex Repeater
- After changes in each section on the Configuration tab, click Apply Changes.
- --> Screen will refresh and give you more options to complete.
- Radio/Modem Type: Set to Icom Repeater Controller ID-RP2C (DStar Repeater Only)
- --> Screen will refresh and give you more options to complete.
- Set Node Callsign to your base callsign for the repeater
- Set Radio Frequency RX: to the frequency the repeater is listening for (aka, what you're transmitting to on your HT/mobile)
- Set Radio Frequency TX: to the frequency the repeater is transmitting on (aka, what you are listening to on your HT/mobile)
- Set Lat/Long, Town, Country (no drop down so...US, USA, United States, United States of America, America all acceptable)
- URL for information about the repeater
- Node Type: set to Public? Not sure what this is for but Public seems to be the right answer.
- Choose the closest/appropriate APRS Host.
- Set Dashboard Language to english_us for me.
- Set Remote Password
- Set Default Reflector to one we use around here.
- ** --> Note: The radio buttons for Startup / Manual confused me. If you don't set it to Startup, ircDDBGateway won't start up without some manual intervention (that I didn't run across how to do)
- Click Apply Changes.
- --> Screen will refresh and give you more options to complete.
- Set Dashboard Access to Public
- Left ircDDBGateway Remote and SSH Access to Private
- Turned AutoAP off. Unnecessary for me.
- Turned uPNP off, since I'm managing access on the router manually
- Click Apply Changes.
- --> Screen will refresh and give you more options to complete.
- Set pi-star user password so you don't expose the web interface to the internet with a default password.
- Click Apply Changes.
- --> Screen will refresh and give you more options to complete.
- Go to Power, Reboot.
- After the interface comes back, go to Expert, Quick Edit: ircDDBGateway
- icomAddress is actually your Pi-Star's virtual IP on the 172.16.0.0/12 network, set to 172.16.0.20/24 (no gateway). Leave this alone.
- icomPort is 20000, the port that the Pi-Star is listening on. Leave this alone.
- repeaterAddress1 is your RP2C on the 172.16.0.0/24 network. Defaults to 172.16.0.1. Leave this alone, assuming you didn't fiddle with the RP2C.
- repeaterPort1 is 20000. I think this was default as well. See folow-onnotes. Leave alone unless you want to do a bunch more work.
- Add your ircddbPassword
- Click Apply Changes.
- Go to Power, Reboot.
Things that caught me up in this install: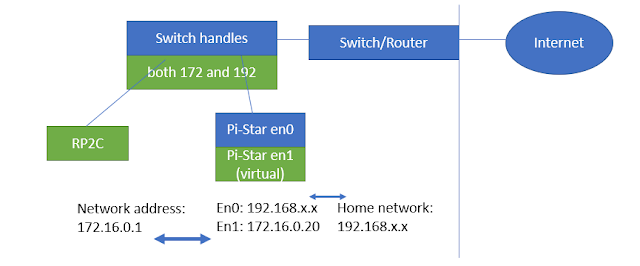
- Inbound, iptables only allows a certain number (although a lot) of udp on private networks. Services sitting on 20000, 10022, 20001, 30001, 30051, 30061-30064, 40000. Sources from 41000-41010, 42000-43000, and 52000. So, the moral of the story here is that the web interface settings don't change iptables, so you can't use 20319 (the Icom RP2C default), or get creative otherwise without finding the script that setups and fixes iptables to allow the traffic.
- Thinking the RP2C is just some normal network device. I mean it is, but don't try to make it something you think you're going to touch on a regular basis. You're going to configure it, with an ethernet cable on the same switch, once or twice and never touch it again. Not worth trying to put it on a normal network with the primary interface of the Pi-Star.
- Just getting the four fields settled in ircDDBGateway.
- Making sure you've got DHCP handing the physical interface, eht0 everything it needs...IP, gateway, DNS...and not on the 172.16/12 network.


